Today I am talking about a new free product I am now using all the time when I quickly need a custom edited globe for one of my designs.
I don’t know about you, but in the past, when I wanted to use a globe in a project, I had my fair share of difficulties:
Not anymore with this PowerGlobe for Illustrator.
I will guide you through each step and share my own PowerGlobe, which I use regularly. It’s simple to understand and implement.
This globe is suitable for various types of artwork, such as designing posters, brochures, and invitations. It is fully vectorized, ensuring high quality even when displayed at larger sizes. You can easily create a globe that is centered on your desired area and customize it using Adobe Illustrator’s tools and the available layers, including countries, sea, coastline, and more.
Some examples of the PowerGlobe in action:
This is an illustration I made for the ‘Atlas Espace et Société 2015’ from Erasme, a french speaking publisher. The PowerGlobe does it work even for print design!
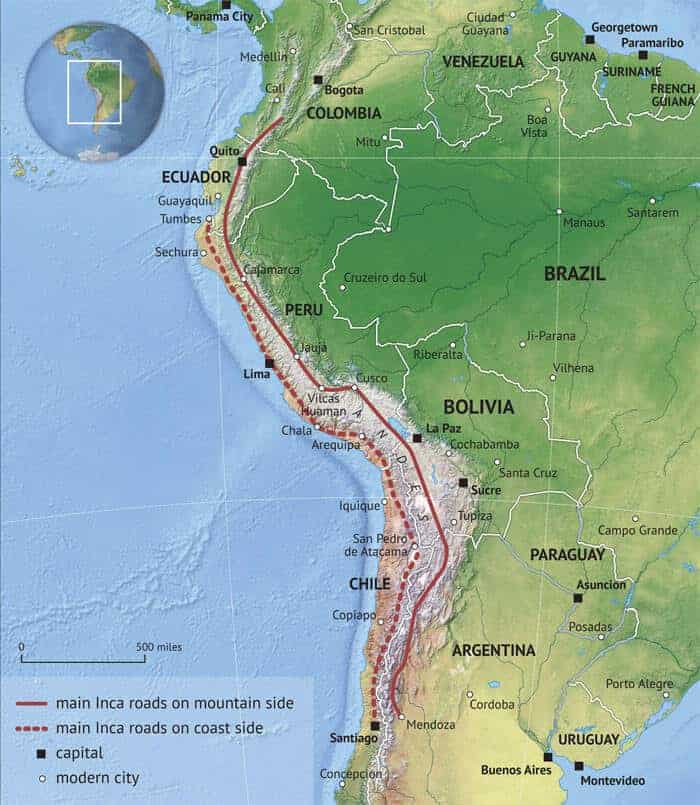
This is the featured map on a Wikipedia article about the Inca Road System. I have drawn this map using our map style Summit. With the PowerGlobe it was easy to locate the area of the map on a globe. I have used the same map style Summit for the globe, so the globe is blending into the main map pretty nice.
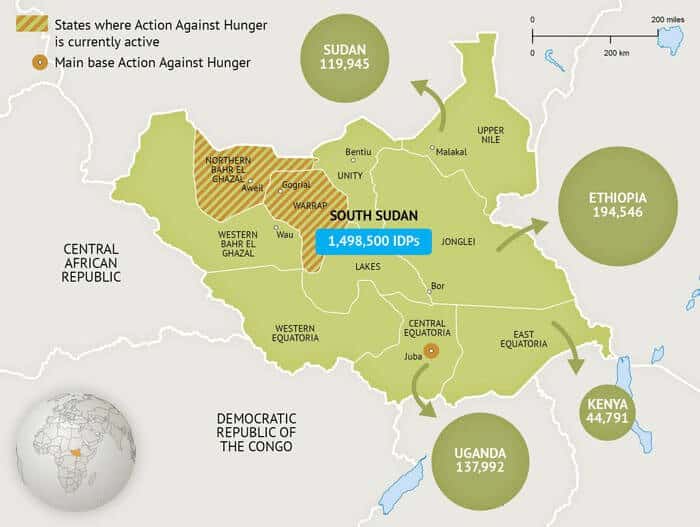
Action Against Hunger, an international humanitarian organization, asked me to make a map about their presence in South Sudan. I added a location map highlighting the country of South-Sudan on a globe. I tweaked the style Defined so it fits right into the main map. The PowerGlobe made me do that in a matter of minutes.
Once again, the PowerGlobe is suitable for every type of artwork, not only maps. It’s a great tool for graphic design in general.
You will receive a high-quality 3D vector globe or sphere that allows easy content editing and one-click rotation to your area of interest.
I have included three map styles in the PowerGlobe to have a solid starting point for your new project. Each map style includes layers with named objects for easy editing and selecting.
I’ll provide a step-by-step guide on using PowerGlobe for Illustrator. Once you’re familiar with it, creating your own customized base globe centered on your area of interest should only take a few minutes.
Due to the nature of how things work in the PowerGlobe, it is best practice to maintain a master copy of the file. So start your work with a fresh copy of the original Illustrator file.
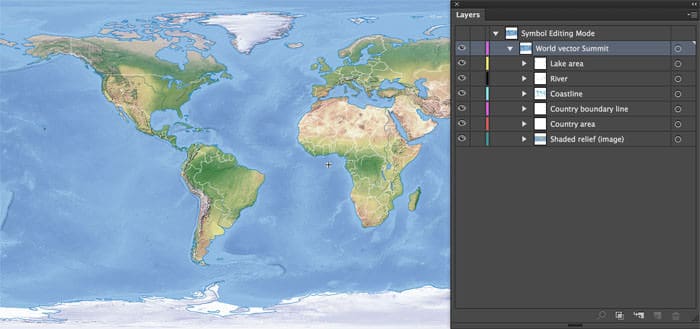
Open the newly created copy and ensure that all layers are locked. While working with the file, you may inadvertently select incorrect objects if you don’t pay attention to the currently active layer. To avoid this, lock all layers. We will unlock the layers one by one as we work on the file.
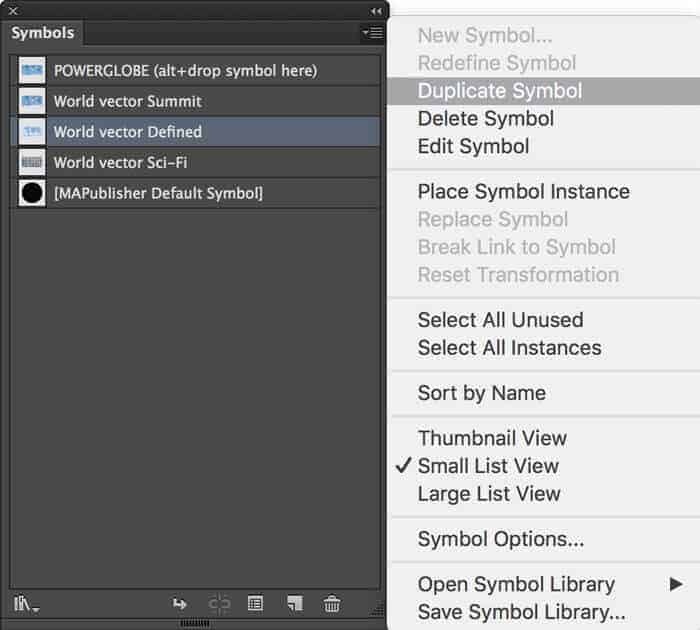
First make up your mind about how the globe should look like. You can alter the looks of globe yourself (more on that later), but I have prepared three map styles you can use right away. To choose your style, you need to open up the Symbols palette.
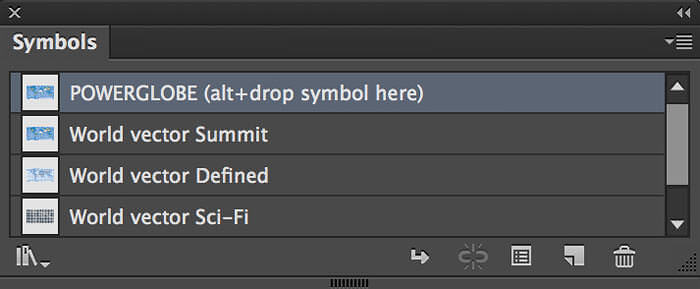
The Symbols palette contains four symbols:
The default symbol that is the one being used for your actual globe:
Three symbols with map styles you can use:
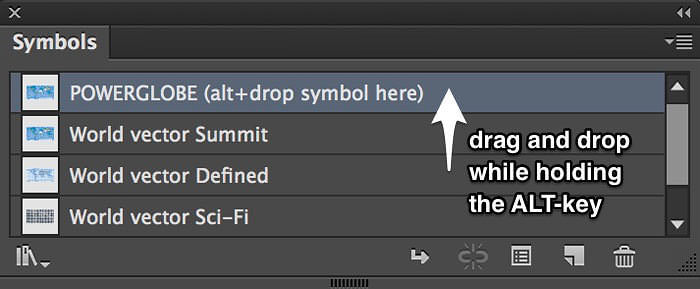
Changing the default map style of the globe is done by dragging and dropping the symbol of your preferred map style over the default one named ‘PowerGlobe’ by pressing and holding the ALT-key.
You will notice that the style of the globe in the artboard changes.
Note the layer ‘Sci-Fi’ in the layers palette. Turn this layer to visible when using the map style ‘World Vector Sci-Fi’, as this layer contains a texture that is specifically made to complement the Sci-Fi look.
So far, so good. Now it’s time to unlock your first layer ‘PowerGlobe’.
To select the PowerGlobe object, click on the left part of the globe using the selection tool or press CMD+A or CTRL+A to select everything. Once everything is selected, open the Graphic Styles palette.
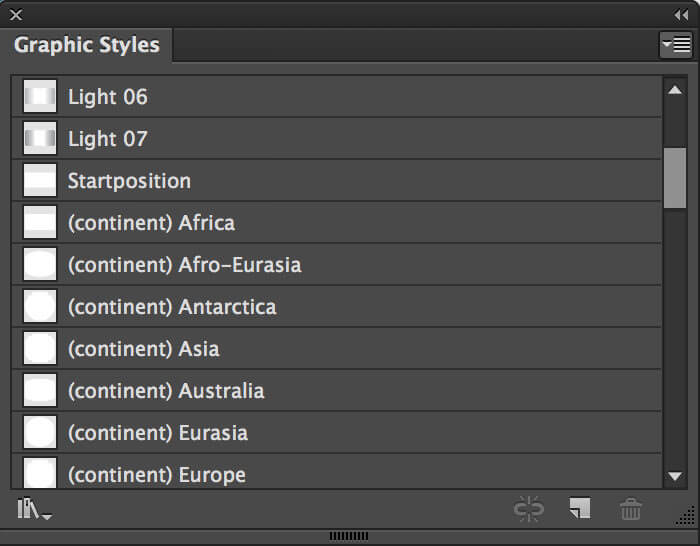
The Graphic Styles palette contains several styles to control the rotation of the globe and to choose different lights for illuminating the globe. The names of the graphic styles for choosing your lights all start with the word ‘Light’. All the other graphic styles are for controlling the rotation of the globe.
In this step, we will focus on graphic styles that control the rotation of the globe. I have given these styles clear names to indicate the specific rotation they represent. For example, selecting the ‘Asia (continent)’ graphic style will rotate the globe to position Asia at its center. If you cannot find the desired center position in the Graphic Styles palette, you can manually rotate the globe. We will discuss this further later on.
Please remember to lock the ‘PowerGlobe’ layer after centering the globe.
To change the lighting of your globe, follow these steps:
1. Unlock the ‘Lights’ layer and lock all other layers.
2. Use the selection tool to click on the left part of the globe or press CMD+A or CTRL+A to select everything.
3. Go to the Graphic Styles palette and select a graphic style that has the word ‘Light’ in its name.
4. Choose the style you prefer.
5. Lock the layer again.
You don’t need to have lights, if you prefer a flat look then you just set the Lights layer invisible.
Please ensure that only the ‘Shadow’ layer is unlocked. Select the actual shadow by clicking anywhere on the globe using the selection tool or by pressing CMD+A or CTRL+A to select everything on the layer. Then, open the Appearance palette.
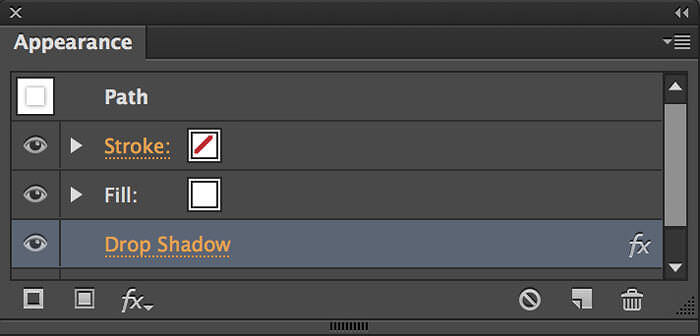
In the appearance palette click on the line that says ‘Drop Shadow’. This will open up the ‘Drop Shadow’ dialog box.
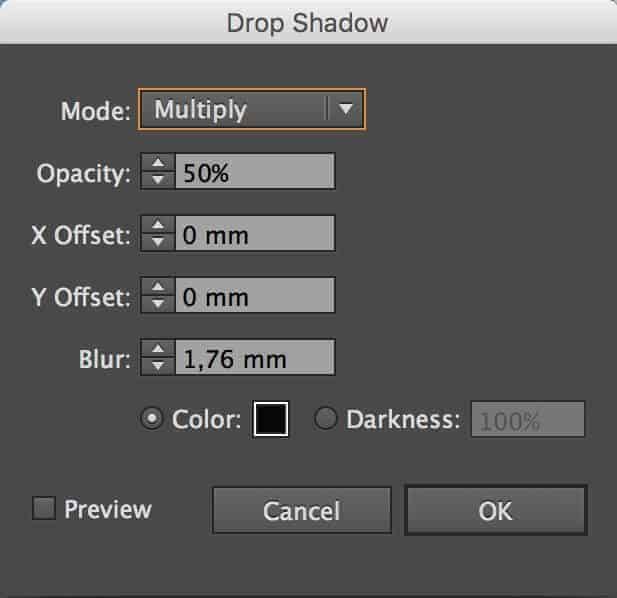
From here you can dial in the values you like for your drop shadow. When checking the box next to ‘Preview’, you can see those changes applied in real time.
If you don’t need a drop shadow, just set the layer ‘Shadow’ invisible.
Don’t forget to lock the layer ‘Shadow’ as soon as you are done with it.
Once again, for your own safety, begin by making sure all layers are locked.
In the Symbols palette choose the map style you want to edit and make a copy of it by selecting the symbol and choosing ‘Duplicate Symbol’ from the Symbols palette options menu.
Now double-click on your duplicated symbol. This will open the symbol itself in editing mode. Each map style contains several layers, making it easy for you to target the objects you want.
You can view this symbol in editing mode as a regular Adobe Illustrator file, meaning you can edit objects on a certain layer, set layers invisible, create new layers and so on.
To create a globe with the continent of Africa highlighted, select all African countries and apply the desired color. If you prefer not to display country boundaries, make the corresponding layer invisible. After completing work on the symbol, double-click anywhere on the artboard to return to the main view of the globe.
Now, you need to set your edited symbol as the default one for the globe. To do this, follow these steps:
1. In the Symbols palette, select the edited symbol.
2. Drag and drop the symbol onto the symbol named ‘PowerGlobe’ while holding the ALT key.
3. Confirm that the globe on the artboard will now display your custom edited map style.
Are you wondering why you shouldn’t edit the PowerGlobe symbol directly? Well, doing so can lead to trouble in the future. When you drop another map style symbol onto the PowerGlobe symbol, it will completely erase the original content of the PowerGlobe symbol, causing you to lose all the edits you made directly to it.
There may be a time when you don’t have enough with the standard centering options the PowerGlobe provides. No problem, you can do this manually, but be aware that it is a bit tricky to get the rotation just right.
Make sure only the layer ‘PowerGlobe’ is unlocked. Select the one object present on the PowerGlobe layer by clicking on the left part of the globe with the selection tool or by selecting everything pressing cmd+A or CTRL+A. Now open up the Appearance palette.
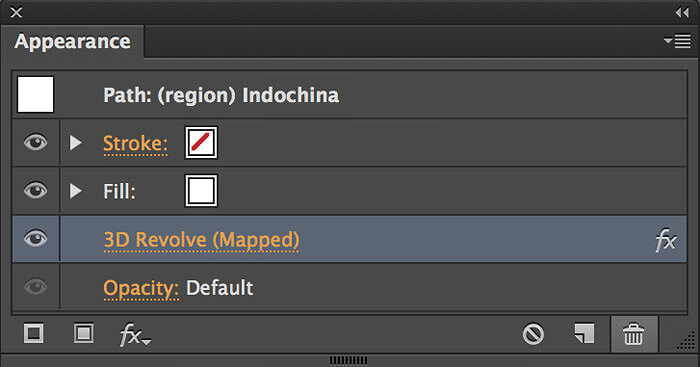
In the Appearance palette click on the line ‘3D Revolve (Mapped)’. This will take you to the 3D Revolve Options dialog box.
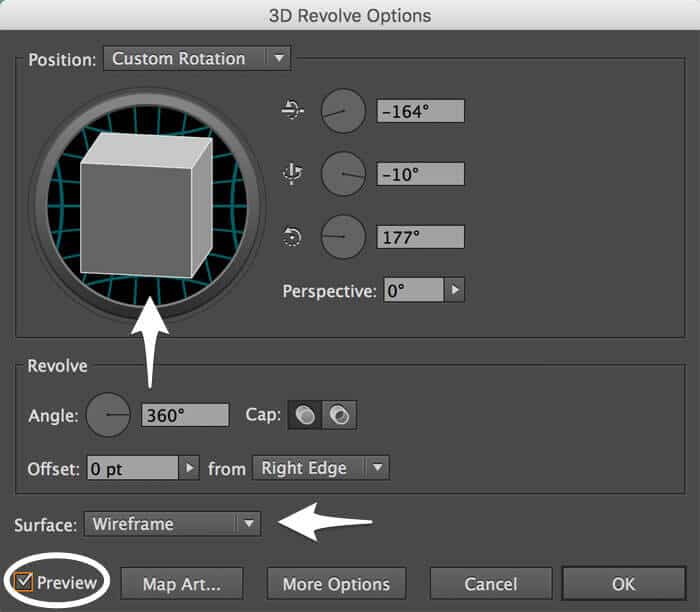
In this dialog box turn on the preview mode by checking the ‘Preview’ box in the bottom left. Next change the ‘Surface’-field to ‘Wireframe’.
Dialing in the rotation values by hand is almost impossible to do. I have tried to come up with some sort of formula, so you could easily calculate the right values. But for the purpose of rotating a 3D globe, it was getting way too complicated. If someone can point me in the right direction, please do.
My alternative can be a little bit tricky, but overall it is fairly easy.
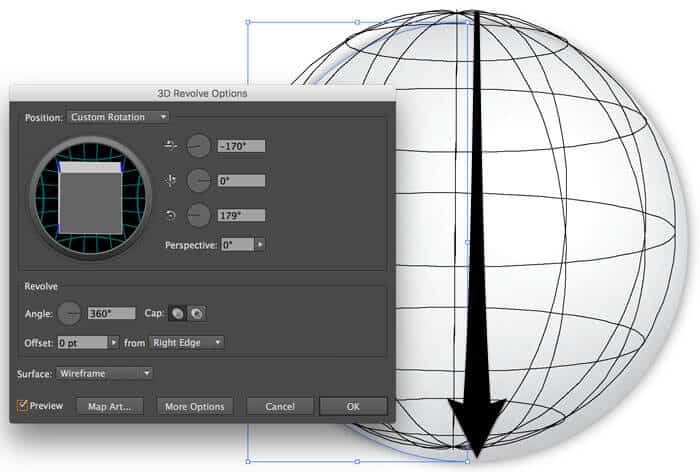
In the 3D Revolve Options dialog box, hover over the cube (located in the top left) and drag it into your desired direction.
Note that as you drag the cube in the 3D Revolve Options dialog box, the wireframe in your artboard will change. The important thing is to ensure that the imaginary line connecting the poles (north and south of the globe) is vertically aligned. Otherwise, the resulting globe may appear to be lying on its back or in an unusual position. Once you’re finished, remember to switch the ‘Surface’ field back from ‘Wireframe’ to ‘No Shading’.
Well, that’s easy, just unlock the appropriate layers, select everything you need and copy/paste it into your other document. You could also export the globe to a bitmap file like JPEG or TIF and use it wherever you want. Export to PNG if you want to maintain transparency around the globe.
I am sure the PowerGlobe will get you up and running with 3D vector globes rapidly. It is by far the fastest method to get results quickly and beautiful. And maybe it could be the only 3D globe you’ll ever need.
Imagine you had to create this kind of globes by hand, think about the time you would need to achieve similar results.
Now you get one globe, that comes with several map styles included, that is centered to the area of your interest with one click and that is totally customizable to fit your needs.
Maybe you come up with map styles of your own; I would like to hear about them! What else do you think about our PowerGlobe? Is there something I could have done better? Please share it, because I wanna know.
If you get some value from the PowerGlobe I would surely appreciate it that you like this post. Follow us on our social networks to stay on top of new products as they arrive.
Your support is what gets us going!
Download and use the PowerGlobe for Illustrator for free.
The PowerGlobe is suitable for Adobe Illustrator version CS6 and above and is published under a Creative Commons License (CC-BY). This means you can use it for any kind of work, even commercially, as long as you give attribution:
‘PowerGlobe by www.onestopmap.com / CC BY’
or online
PowerGlobe by One Stop Map / CC BY
<a title="PowerGlobe for Illustrator" href="https://www.onestopmap.com/blog/powerglobe-for-illustrator/">PowerGlobe</a> by One Stop Map / CC BY
